Build a newsletter chatbot in PHP - Part 2
#chatbotsThis is part two of building a newsletter chatbot in PHP. In part one, we already created a little Facebook Messenger chatbot that welcomes you and tells you about the subscriptions process. Now we need to actually store those subscriptions in order to send out our first newsletter. Let's do this.
If you're looking for part one, you can find it here.
Storing subscriptions
You probably have noticed that we aren't storing any information yet. Yes, you're right :-) So let's do that.
What we want is a users table, where we can see who has already subscribed to the newsletter. Laravel comes with a basic user migration file. We can edit database/migrations/..._create_users_table.php and add the Facebook user data. Depending on the user's permissions, not all values are accessible. We make this values nullable.
public function up()
{
    Schema::create('users', function (Blueprint $table) {
        $table->increments('id');
        $table->string('fb_id');
        $table->string('first_name');
        $table->string('last_name');
        $table->boolean('subscribed')->default(false);
        $table->timestamps();
    });
}
Now create the table with php artisan migrate.
And in the App/User.php user model, we ad a method to update or create a user.
public static function createFromIncomingMessage(\BotMan\Drivers\Facebook\Extensions\User $user)
{
    User::updateOrCreate(['fb_id' => $user->getId()], [
        'fb_id' => $user->getId(),
        'first_name' => $user->getFirstName(),
        'last_name' => $user->getLastName(),
        'profile_pic' => $user->getProfilePic(),
        'locale' => $user->getLocale(),
        'gender' => $user->getGender(),
    ]);
}
Also, make sure to update the fillable array of the user class. Only these values are allowed to be stored.
protected $fillable = [
    'fb_id',
    'first_name',
    'last_name',
];
We want to add a new user after the subscription approval.
if ($answer->getValue() === 'yes') {
	User::createFromIncomingMessage($this->bot->getUser());
	$this->bot->reply('Wuhu, great to have you on board! 🎉');
	$this->bot->reply('I will message you when there is something new to tell ✌️');
} else {
	$this->bot->reply('Ok no problem. If change your mind, just type "subscribe".');
}
Don't forget to add the user class namespace use App\User; to the top of the file as well. Give it a try. Type "subscribe" in the chat and with a little luck, you should get a reply and new user entry in your database.
If not, check your logs for errors. If your app is responding to Facebook with a 500 error, make sure to uncomment the lines responsible for it immediately. This is important because Facebook will send, in case of an error, the message again and again. The sooner your application responds with a 200 code, the better it is. You can debug afterwards.
Now that we have the users in our database we want to be able to subscribe and unsubscribe them. This is what the boolean subscribed field in the users table is for. I will use two more user model methods to fill it.
/**
 * Subscribe user to newsletter
 *
 * @param string $facebookId
 */
public static function subscribe(string $facebookId)
{
    $user = User::where('fb_id', $facebookId)
        ->first();

    if ($user) {
        $user->subscribed = true;
        $user->save();
    }
}

/**
 * Unsubscribe user from newsletter
 *
 * @param string $facebookId
 */
public static function unsubscribe(string $facebookId)
{
    $user = User::where('fb_id', $facebookId)
        ->first();

    if ($user) {
        $user->subscribed = false;
        $user->save();
    }
}
Nothing special here. We are just checking to see if the user exists and then change the subscription boolean. We can now add those methods to our subscription conversation.
if ($answer->getValue() === 'yes') {
	User::createFromIncomingMessage($this->bot->getUser());
    User::subscribe($answer->getMessage()->getSender()); // new
    $this->bot->reply('Woohoo, great to have you on board! 🎉');
    $this->bot->reply('I will message you when there is something new to tell ✌️');
} else {
    User::unsubscribe($answer->getMessage()->getSender()); // new
    $this->bot->reply('Ok no problem. If change your mind, just type "subscribe".');
}
And again please try it out yourself. When you subscribe, you should see that in the user table in your database.
Sending newsletters
Requirements
Until now, we got everything set up to welcome users and to sign them in. Obviously, we are not done yet. We also want to send the users little messages about my book from time to time. It is no problem to send messages to users when they start a conversation with your bot. But sending replies, 24 hours after the last conversation, is not allowed. You must apply for the pages_messaging_subscriptions permission, to make that possible. Go to your Messenger settings and submit your Facebook App for a review, including pages_messaging_subscriptions.
For testing purposes, you don't need that. So for now, we're just fine without it.
Originating messages
Normally, this is the message flow: The user sends something, the bot replies. This is the same with the get_started button on Facebook. Here the button triggers the first "message", to which the bot replies. But with our newsletter bot, we want the bot to make the first step. In BotMan terms, this is called originating messages. This is an example of the BotMan documentation.
$botman->say('Message', 'my-recipient-user-id', TelegramDriver::class);
It looks very similar to what we already know. The only difference is, that we provide the say method with a user ID and a driver name. I like to create a Laravel command and to place this code there. It gives me more freedom on how to trigger the message later, like with a cronjob.
php artisan make:command SendOutNewsletter
This creates a new command class in /app/Console/Commands/. There we can define a signature and a description.
protected $signature = 'newsletter:send';

protected $description = 'Send newsletter to all subscribers';
The description, you will see when you list all the artisan commands. The signature defines the command to run this code. In our case, it will be php artisan newsletter:send. But first, we need to place our code in the handle method. Here is the whole file.
<?php

namespace App\Console\Commands;

use App\User;
use Illuminate\Console\Command;
use BotMan\Drivers\Facebook\FacebookDriver;

class SendOutNewsletter extends Command
{
    /**
     * The name and signature of the console command.
     *
     * @var string
     */
    protected $signature = 'newsletter:send';


    /**
     * The console command description.
     *
     * @var string
     */
    protected $description = 'Send newsletter to all subscribers';

    /**
     * Create a new command instance.
     *
     * @return void
     */
    public function __construct()
    {
        parent::__construct();
    }

    /**
     * Execute the console command.
     *
     * @return mixed
     */
    public function handle()
    {
        // init botman
        $botman = app('botman');

        $users = User::where('subscribed', true)->get();

        $users->each(function ($user) use ($botman){
            try {
                $botman->say('Hey ' .$user->first_name.' ...', $user->fb_id, FacebookDriver::class);
            } catch (\Exception $e) {
                $this->info('FAIL sending message to '.$user->fb_id);
                $this->info($e->getCode().': '.$e->getMessage());
            }
        });

        $this->info('Success.');
    }
}
First, the BotMan instance is resolved from the service container. Then we grab all the subscribed users from the database, in order to loop over them. We now send each user a message. The content is totally up to you of course. You can send just one message or multiple ones with different templates as well. For this example, one message is enough. You probably also noticed that we can personalize the messages with the name from the user table.
Run this command with php artisan newsletter:send and there should be a new message in your chat. Congratulations, you just sent your first messenger newsletter.
Extras
Typing indicator
Essentially, we are almost done. Just two more things I want to add. First, you have probably noticed that the bot's messages pop in very fast. This is a problem when your text gets longer and the user needs more time to read. In Facebook, there is a typing indicator which you probably already know. It shows some animated bubbles, that tell you that the other chat member is typing right now. This is possible with bots as well with the typesAndWaits method in BotMan. It shows the typing indicator and waits for the desired time before moving on. This is exactly what we need.
These are the conversation methods with the new additions:
private function welcome()
{
    $this->bot->typesAndWaits(.5);
    $this->bot->reply('Hey and welcome! 👋');

    $this->askAboutSubscription();
}

private function askAboutSubscription()
{
    $this->bot->typesAndWaits(.5);
    $this->bot->reply('I help Christoph to spread some news about his book development. 📘');
    $this->bot->typesAndWaits(1);
    $this->bot->reply('If you like, I can keep you updated about it here on Facebook Messenger.');
    $this->bot->typesAndWaits(1);

    $question = Question::create('Are you in?')
        ->addButtons([
            Button::create('Yes please')
                ->value('yes'),
            Button::create('Nope')
                ->value('no'),
        ]);

    $this->ask($question, function (Answer $answer) {
        if ($answer->getValue() === 'yes') {
            User::subscribe($answer->getMessage()->getSender());
            $this->bot->reply('Woohoo, great to have you on board! 🎉');
            $this->bot->typesAndWaits(.5);
            $this->bot->reply('I will message you when there is something new to tell ✌️');
            $this->bot->typesAndWaits(.5);
        } else {
            User::unsubscribe($answer->getMessage()->getSender());
            $this->bot->typesAndWaits(1);
            $this->bot->reply('Ok no problem. If change your mind, just type "subscribe".');
        }

        $this->bot->typesAndWaits(1);
        $this->bot->reply("Christoph also likes to blog a lot. Make sure to check out his site for more chatbot stuff: \n ✨ https://christoph-rumpel.com/ ✨ ");
        $this->bot->typesAndWaits(1);
        $this->bot->reply('See you! 👋');
    });
}
Fallback
Another great little BotMan feature is the fallback method. For all incoming messages, that don't match your listeners, you can define some actions as well. I like to tell the user about what the bot can in order to help him with the next steps. Place it into your routes/botman.php file. The whole file now looks like this:
<?php
use BotMan\BotMan\BotMan;
use App\Http\Conversations\SubscribeConversation;
use BotMan\Drivers\Facebook\Extensions\ButtonTemplate;
use BotMan\Drivers\Facebook\Extensions\ElementButton;
$botman = resolve('botman');
$botman->hears('GET_STARTED|subscribe', function (BotMan $bot) {
$userFromStartButton = $bot->getMessage()->getText() === 'GET_STARTED' ? true : false;
$bot->startConversation(new SubscribeConversation($userFromStartButton));
});
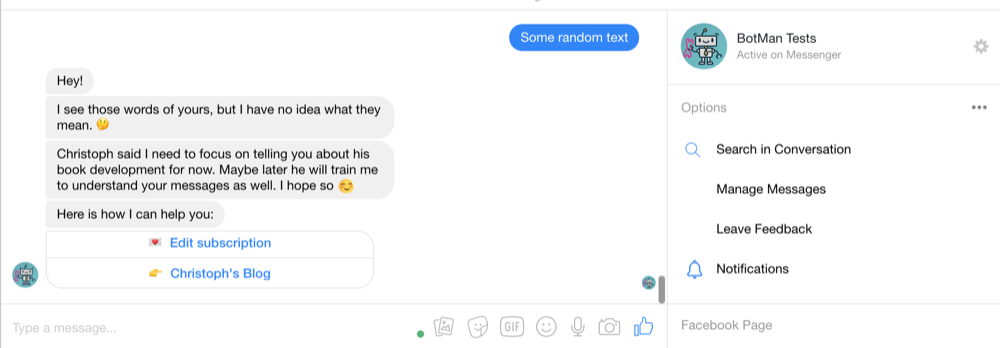
$botman->fallback(function(BotMan $bot) {
$bot->reply('Hey!');
$bot->typesAndWaits(1);
$bot->reply('I see those words of yours, but I have no idea what they mean. 🤔');
$bot->typesAndWaits(1);
$bot->reply('Christoph said I need to focus on telling you about his book development for now. Maybe later he will train me to understand your messages as well. I hope so ☺️');
$bot->typesAndWaits(1);
$question = ButtonTemplate::create('Here is how I can help you:')->addButtons([
ElementButton::create('💌 Edit subscription')->type('postback')->payload('subscribe'),
ElementButton::create('👉 Christoph\'s Blog')->url('https://christoph-rumpel.com/')
]);
$bot->reply($question);
});
Don't just reply with Sorry I don't understand your message. Give the user opportunities and help to move one. In my case, I tell them how to edit their subscription and where they can find more chatbot stuff of mine.
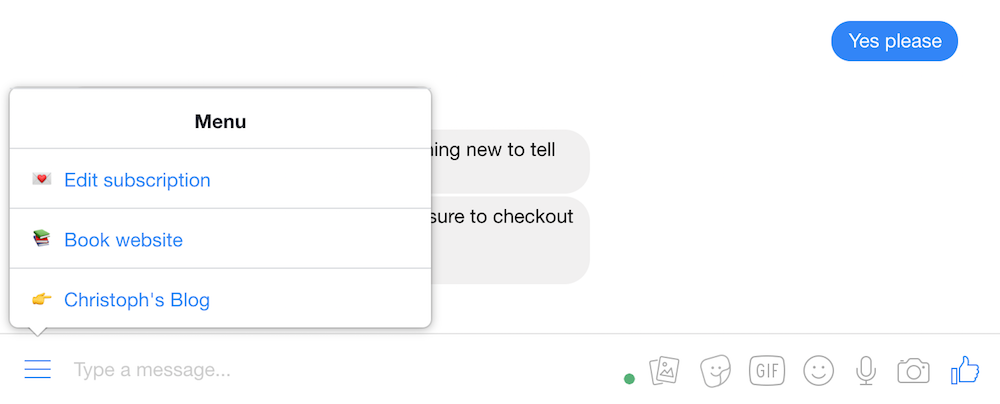
Add a menu
With Facebook Messenger, it is possible to add chat menus. This helps the user to find main features or help. BotMan makes it super simple to add one of those menus. In our case, it would be helpful to start the subscription process through the menu, as well as add the link to the book and to my blog.
First, we need to define the menu structure. There is default on in the config/botman/facebook.php file within the persistent_menu key. Let's change that to this one:
'persistent_menu' => [
    [
        'locale' => 'default',
        'composer_input_disabled' => 'false',
        'call_to_actions' => [
            [
                'title' => '💌 Edit subscription',
                'type' => 'postback',
                'payload' => 'subscribe',
            ],
            [
                'type' => 'web_url',
                'title' => '📚 Book website ',
                'url' => 'https://christoph-rumpel.com/build-chatbots-with-php',
                'webview_height_ratio' => 'full',
            ],
            [
                'type' => 'web_url',
                'title' => '👉 Christoph\'s Blog',
                'url' => 'https://christoph-rumpel.com',
                'webview_height_ratio' => 'full',
            ],
        ],
    ],
],
It is also possible to disable the chat's text input. In some cases, this can be useful when you want the user to only use the menu, but it doesn't make sense for us. Make sure to disable it.
'composer_input_disabled' => 'false',
Perfect. Next, this needs to be sent to Facebook. This is where BotMan helps us with another neit command.
php artisan botman:facebookAddMenu
It sends an HTTP request to Facebook and you should see a success message in your terminal. Now leave the chat and enter it again. There should be now the little burger menu in the bottom left corner. Try it out. Nice, right?
Next up
That's it for part two of this little series. We are able to store users and to flag the subscribed ones. I also showed you how to send out your first newsletter and we integrated some extras for our bot. But we are not finished yet. The next part will be about adding this chatbot to a website and about writing our first tests. So stay tuned, for the third and final part.