How I Built The LaravelQuiz Chatbot With BotMan and Laravel
#laravel,chatbotsEver wondered how well you know your favorite PHP framework Laravel? Give the LaravelQuiz Chatbot a try, and you will find out. This article is a step by step guide on how I created this chatbot with BotMan and Laravel.
Intro
Hey everyone. In this article, I want to show you how I built the LaravelQuiz Chatbot. If you haven't tried it yet, it is a good idea to check it out before reading this article. This will help to understand what I am talking about. Right now it only supports Telegram.
The chatbot provides a quiz with all kinds of questions about the Laravel framework. Every question comes with up to three possible answers. You need to pick the right one to collect points and make it to the highscore. But besides the ranks, the quiz is about having a good time. Enjoy the questions and see what you know about Laravel. Have fun!
Setup
Let's start this project by installing BotMan Studio. The easiest way to install BotMan Studio is via the installer. (Skip this, if you got it already installed)
composer global require "botman/installer"
Then we can crate a new BotMan Studio instance.
botman new laravelquiz-chatbot
Since we want to provide this bot on Telegram, we need to install the TelegramDriver as well.
php artisan botman:install-driver telegram
This will install the Telegram driver and add the Telegram config file /config/botman/telegram.php. In there, you will see that it loads the Telegram bot token from the environment file. You get this token when you create a Telegram bot. Add it to the .env file like:
TELEGRAM_TOKEN=your-telegram-token-here
Now we can connect the BotMan application to the Telegram bot. Create a secured public URL with Laravel Valet.
valet share
There is an excellent artisan command, that lets us set our BotMan URL via the command line. Make sure to add "/botman" to your application's URL. Just follow the instructions.
php artisan botman:telegram:register
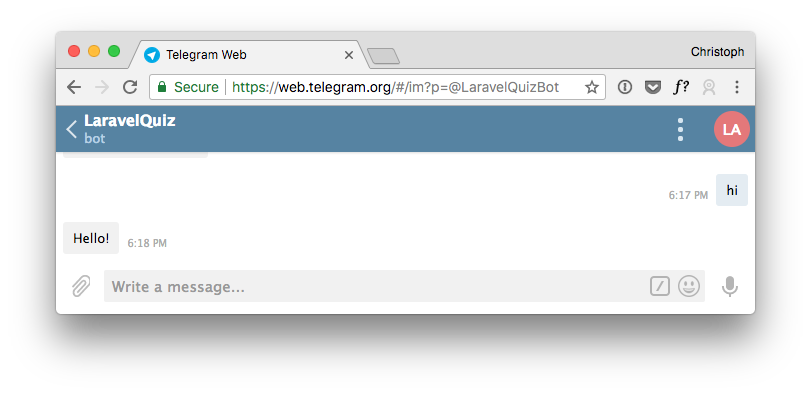
You should get a success message. If not, please check that your provided URL is correct. To make sure the bot is connected to our application, type hi.
Storing Questions and Answers
Next, we want to think about our questions. The bot will ask the user about 20 questions. It will also provide two or three possible answers. I want to store questions and answers in a database. Each answer is connected to one question. So we need a table for the questions and one for the answers. We start with the questions.
Questions
php artisan make:migration create_questions_table --create=questions
php artisan make:model Question
The model we will use later. Now we define our table structure for the questions.
public function up()
{
    Schema::create('questions', function (Blueprint $table) {
        $table->increments('id');
        $table->string('text');
        $table->integer('points')->unsigned();
        $table->timestamps();
    });
}
Every question has text and points. The user will get these points if he answers correctly.
Answers
Next, we create a migration for the answers.
php artisan make:migration create_answers_table --create=answers
php artisan make:model Answer
Since an answer is connected to a question, we use a question_id field. Additionally, we also add a text field and a flag to define if this answer is the correct one.
public function up()
{
    Schema::create('answers', function (Blueprint $table) {
        $table->increments('id');
        $table->integer('question_id');
        $table->string('text');
        $table->boolean('correct_one');
        $table->timestamps();
    });
}
Last step here is to connect the models. We can do this by adding a relationship to the Question model.
<?php

namespace App;

use Illuminate\Database\Eloquent\Model;

class Question extends Model
{
    public function answers()
    {
        return $this->hasMany(Answer::class);
    }
}
Create and Fill The Tables
Before we can create these tables, we need to define our database credentials in the .env file. I use Laravel Valet with this settings. Of course, they will be different, depending on your local setup.
DB_DATABASE=laravelquiz-chatbot
DB_USERNAME=root
DB_PASSWORD=
Now, we can create the tables.
php artisan migrate
Nice! Our tables are ready to get filled. I decided to use a Laravel Seeder class to do so. This way I can keep all questions and answers inside the repository and use an artisan command to fill the database.
php artisan make:seeder QuestionAnswerSeeder
You could use two different seeders as well, but I am okay with one here. In the run method of the seeder, I am truncating the tables and then store each question and its answers.
public function run()
    {
        Question::truncate();
        Answer::truncate();
        $questionAndAnswers = $this->getData();

        $questionAndAnswers->each(function ($question) {
            $createdQuestion = Question::create([
                'text' => $question['question'],
                'points' => $question['points'],
            ]);

            collect($question['answers'])->each(function ($answer) use ($createdQuestion) {
                Answer::create([
                    'question_id' => $createdQuestion->id,
                    'text' => $answer['text'],
                    'correct_one' => $answer['correct_one'],
                ]);
            });
        });
    }
For the actual data, I use a separate getData method to keep it cleaner. In this method, I return a big collection with all the questions and answers. For better reading, I only show two of them here.
private function getData()
{
    return collect([
        [
            'question' => 'Who created Laravel?',
            'points' => '5',
            'answers' => [
                ['text' => 'Christoph Rumpel', 'correct_one' => false],
                ['text' => 'Jeffrey Way', 'correct_one' => false],
                ['text' => 'Taylor Otwell', 'correct_one' => true],
            ],
        ],
        [
            'question' => 'Which of the following is a Laravel product?',
            'points' => '10',
            'answers' => [
                ['text' => 'Horizon', 'correct_one' => true],
                ['text' => 'Sunset', 'correct_one' => false],
                ['text' => 'Nightfall', 'correct_one' => true],
            ],
        ],
    ]);
}
As you can see, the code is quite straightforward. It is just a big array with all the data for questions and answers. Don't forget to import the namespaces for the Answer and Question class. Inside database/seeds/DatabaseSeeder.php I add this new seeder to the run method.
public function run()
{
    $this->call(QuestionAnswerSeeder::class);
}
As a result, we can now seed the tables with an artisan command.
php artisan db:seed
Voilà, we have our questions and answers in the database!
QuizConversation
Now that everything is setup, we can go on and implement the chatbot logic for showing the questions to the user. I already know that I want to use a conversation class just for this purpose. Create a app/Conversation/QuizConversation.php file and fill it with this base code.
<?php

namespace App\Conversations;

use BotMan\BotMan\Messages\Conversations\Conversation;

class QuizConversation extends Conversation
{


    /**
     * Start the conversation.
     *
     * @return mixed
     */
    public function run()
    {
    }
}
Let's recap what we want to achieve - The questions are stored in the database. We want to grab them and ask the user each of them. If you have followed other chatbot tutorials of mine, you've probably recognized that I usually write a method for every question. This would lead to more than 20 methods and a lot of code here. So what else can we do? All the questions are very similar to each other. The only significant difference is that some have two and some three possible replies. But that's not a big deal. The goal is to use one single method to ask these questions.
Show Info
But before dealing with the questions, we tell the user what this conversation is about.
/** @var integer */
protected $questionCount = 0;
public function run()
{
$this->showInfo();
}
private function showInfo()
{
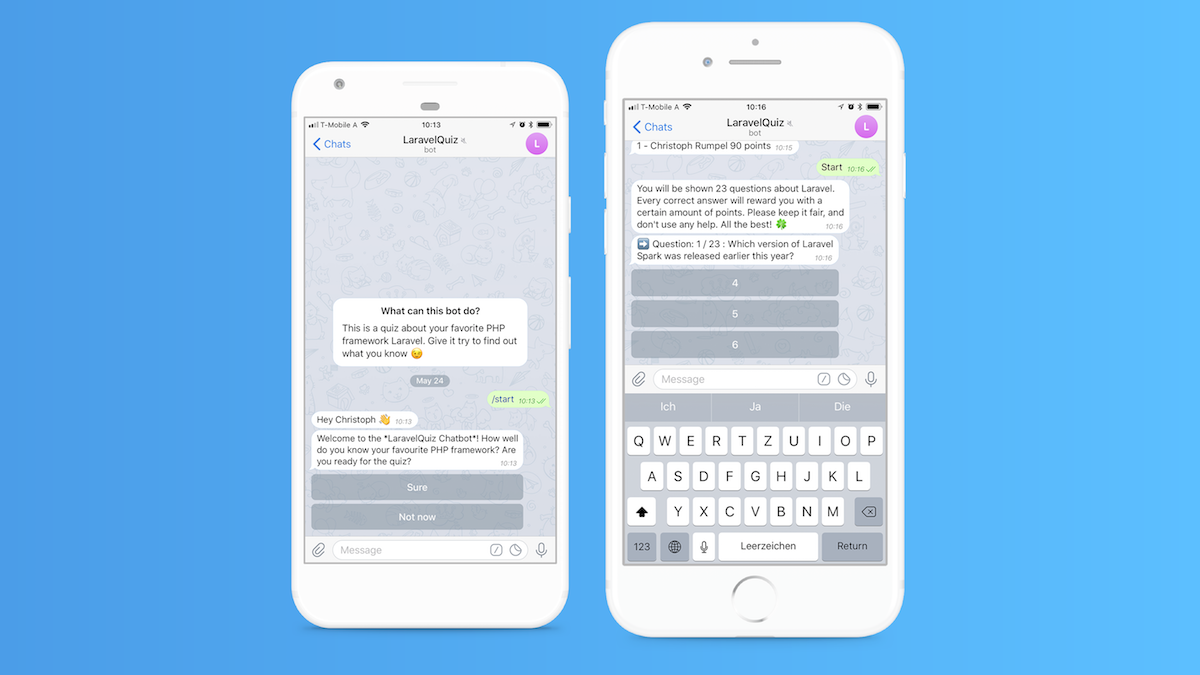
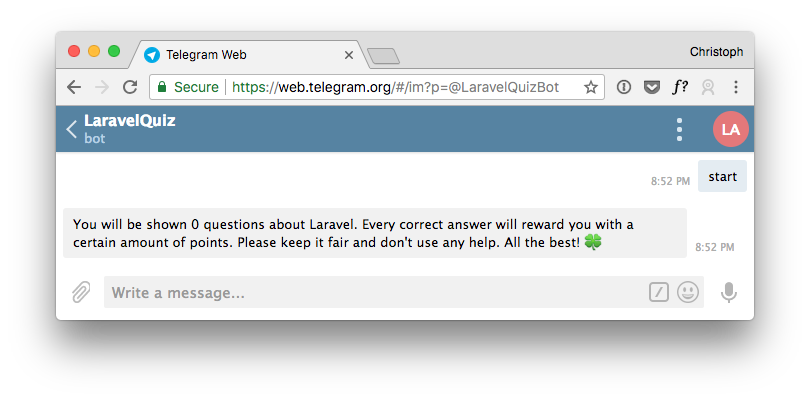
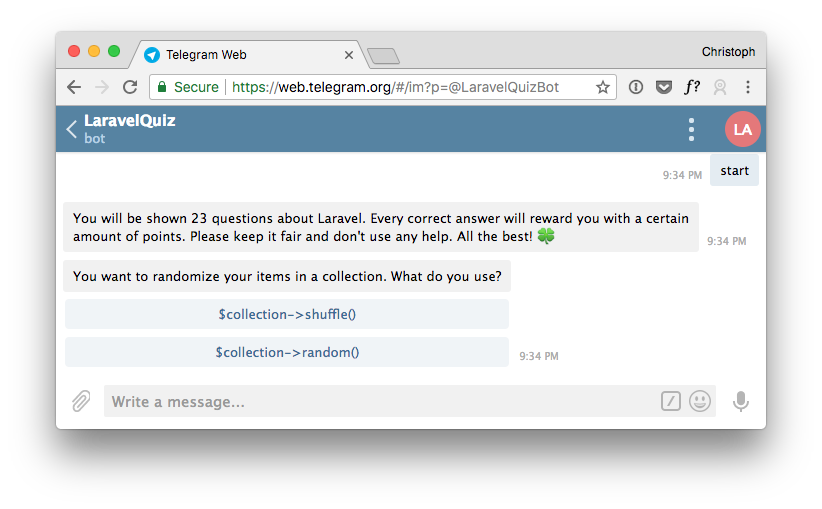
$this->say('You will be shown '.$this->questionCount.' questions about Laravel. Every correct answer will reward you with a certain amount of points. Please keep it fair, and don\'t use any help. All the best! 🍀');
}
To try this out, we need to add a listener to the routes/botman.php file.
<?php

use BotMan\BotMan\BotMan;
use App\Conversations\QuizConversation;

$botman = resolve('botman');

$botman->hears('Hi', function (BotMan $bot) {
    $bot->reply('Hello!');
});

$botman->hears('start', function (BotMan $bot) {
    $bot->startConversation(new QuizConversation());
});
Typing start will kick off this conversation. Try it out in the Telegram chat.
Looping Questions
To make looping the questions work, we need a few things. First, we define some more class properties. We will require them to show the user how many questions are left and to count the user's points.
/** @var Question */
protected $quizQuestions;

/** @var integer */
protected $userPoints = 0;

/** @var integer */
protected $userCorrectAnswers = 0;

/** @var integer */
protected $questionCount = 0; // we already had this one

/** @var integer */
protected $currentQuestion = 1;
Then in the run method, we load our questions and fill some properties. We also shuffle the questions and switch the collection's key to the id. This will make it easier for us to remove items from the collection.
 public function run()
{
    $this->quizQuestions = Question::all()->shuffle();
    $this->questionCount = $this->quizQuestions->count();
    $this->quizQuestions = $this->quizQuestions->keyBy('id');
    $this->showInfo();
}
Then, before showing a question, we check if there are any left. After every question we will remove it. When there are no more questions left, we show the user the quiz result.
private function showInfo()
{
    $this->say('You will be shown '.$this->questionCount.' questions about Laravel. Every correct answer will reward you with a certain amount of points. Please keep it fair and don\'t use any help. All the best! 🍀');
    $this->checkForNextQuestion();
}

private function checkForNextQuestion()
{
    if ($this->quizQuestions->count()) {
		return $this->askQuestion($this->quizQuestions->first());
	}

	$this->showResult();
}
And here is the askQuestion method. It always gets the first item of the questions collections and uses the BotMan ask method to show the text to the user, as well as the answers. We loop over the question's answers, to add a button for each of them to the template.
private function askQuestion(Question $question)
{
    $questionTemplate = BotManQuestion::create($question->text);

    foreach ($question->answers->shuffle() as $answer) {
        $questionTemplate->addButton(Button::create($answer->text)->value($answer->id));
    }

    $this->ask($questionTemplate, function (BotManAnswer $answer) use ($question) {
        $this->quizQuestions->forget($question->id);

        $this->checkForNextQuestion();
    });
}

private function showResult()
{
    $this->say('Finished 🏁');
}
Also, we add a showResult method, which is called when there are no more questions left. When you start the conversation again, you should be able to see all the questions. Each click on an answer will result in the next question, and after the last one, you should get the finish message. Try it out yourself.
Adding Details
This is already great. We can use this code to show as many questions as we want. At any time we can add a question to the database and the code will still work. I love it!
Now I want to work on the details. There are a bunch of things to add:
- show current question
- show how many questions are left
- show the users' choice
- tell if the reply was correct
- show the result
I am not able to go into each of them in depth. This is why I will show the changed methods and explain important steps.
private function askQuestion(Question $question)
{
    $this->ask($this->createQuestionTemplate($question), function (BotManAnswer $answer) use ($question) {
		$quizAnswer = Answer::find($answer->getValue());

		if (! $quizAnswer) {
			$this->say('Sorry, I did not get that. Please use the buttons.');
			return $this->checkForNextQuestion();
		}

		$this->quizQuestions->forget($question->id);

		if ($quizAnswer->correct_one) {
			$this->userPoints += $question->points;
			$this->userCorrectAnswers++;
			$answerResult = '✅';
		} else {
			$correctAnswer = $question->answers()->where('correct_one', true)->first()->text;
			$answerResult = "❌ (Correct: {$correctAnswer})";
		}
		$this->currentQuestion++;

		$this->say("Your answer: {$quizAnswer->text} {$answerResult}");
		$this->checkForNextQuestion();
	});
}

private function createQuestionTemplate(Question $question)
{
    $questionText = '➡️ Question: '.$this->currentQuestion.' / '.$this->questionCount.' : '.$question->text;
    $questionTemplate = BotManQuestion::create($questionText);
    $answers = $question->answers->shuffle();

    foreach ($answers as $answer) {
        $questionTemplate->addButton(Button::create($answer->text)->value($answer->id));
    }

    return $questionTemplate;
}

private function showResult()
{
    $this->say('Finished 🏁');
	$this->say("You made it through all the questions. You reached {$this->userPoints} points! Correct answers: {$this->userCorrectAnswers} / {$this->questionCount}");

}
Note that there is a new separate createQuestionTemplate method to make the code cleaner. Also interesting is that I check if the user's reply is from a button click. If not, I will repeat this question. This is possible because the buttons have the answer's id as the value. We use it to find the answer.
$quizAnswer = Answer::find($answer->getValue());

if (! $quizAnswer) {
	$this->say('Sorry, I did not get that. Please use the buttons.');
	return $this->checkForNextQuestion();
}
HighscoreConversation
Create a Table and Model
To make the quiz more fun, we need a highscore. We start by adding a migration and the model.
php artisan make:migration create_highscore_table --create=highscore
php artisan make:mode Highscore
In there, we save the user's chat ID, the name, points, count of correct answers and how often he tried. Since we work with points, it might be possible that someone answers less question correctly, but still leads the highscore table.
The Highscore model will include a few things. First, we define the fillable property to whitelist what values we can store later. Also, the table name needs to be defined here because it differs from the traditional names.
protected $fillable = ['chat_id', 'name', 'points', 'correct_answers', 'tries'];
protected $table = 'highscore';
Then we add a method for storing highscore entries. I use the updateOrCreate method to prevent duplicate entries. Every user should only have one entry. With every new try, the highscore will get updated. The unique field for these entries is the chat_id and not, like normally, the id field. The updateOrCreate method gets this info as the first parameter. Also note how I increase the tries field if the entry is not a new one. For this, the wasRecentlyCreated method comes in handy.
public static function saveUser(UserInterface $botUser, int $userPoints, int $userCorrectAnswers)
{
    $user = static::updateOrCreate(['chat_id' => $botUser->getId()], [
		'chat_id' => $botUser->getId(),
		'name' => $botUser->getFirstName().' '.$botUser->getLastName(),
		'points' => $userPoints,
		'correct_answers' => $userCorrectAnswers,
	]);

	$user->increment('tries');

	$user->save();

	return $user;
}
At the end of the quiz, we show the user his rank. This is what the next method is for. We count how many users have more points than the current one. We are only interested in the unique values because users with the same count will share a rank.
public function getRank()
{
    return static::query()->where('points', '>', $this->points)->pluck('points')->unique()->count() + 1;
}
For the highscore, only the top 10 users will be shown.
public static function topUsers($size = 10)
{
	return static::query()->orderByDesc('points')->take($size)->get();
}
We fetch the users with the most points and add a rank field to every entry.
Show The Highscore
For displaying the highscore we create a new conversation class app/Conversations/HighscoreConversation.php.
<?php
namespace App\Conversations;
use App\Highscore;
use BotMan\BotMan\Messages\Conversations\Conversation;
class HighscoreConversation extends Conversation
{
/**
* Start the conversation.
*
* @return mixed
*/
public function run()
{
$this->showHighscore();
}
private function showHighscore()
{
$topUsers = Highscore::topUsers();
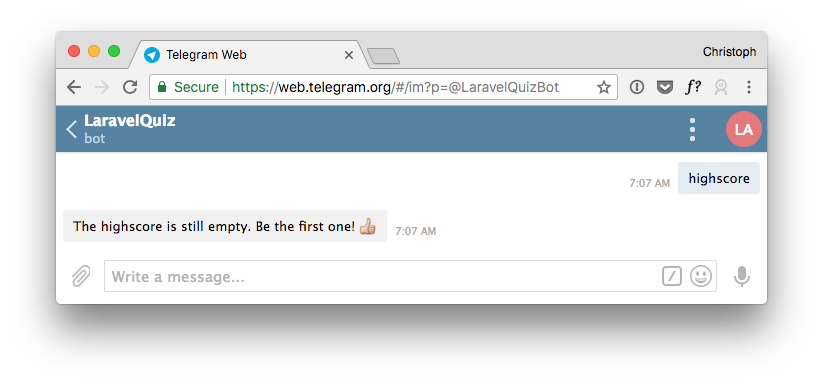
if (! $topUsers->count()) {
return $this->say('The highscore is still empty. Be the first one! 👍');
}
$topUsers->transform(function ($user) {
return "{$user->rank} - {$user->name} {$user->points} points";
});
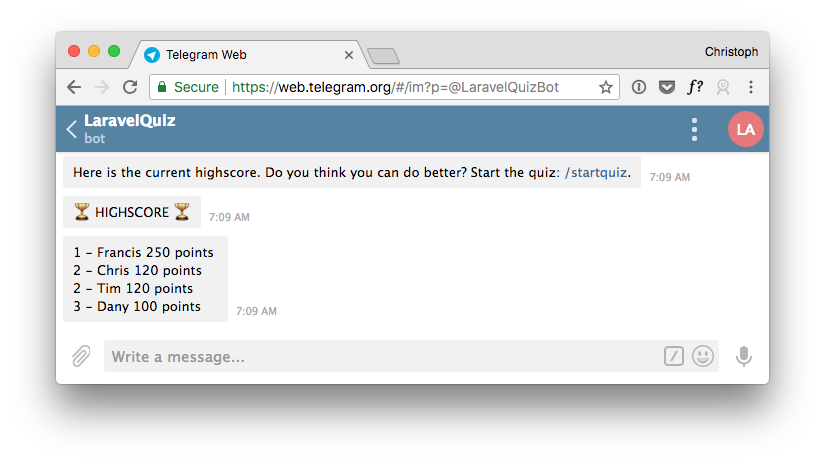
$this->say('Here is the current highscore. Do you think you can do better? Start the quiz: /startquiz.');
$this->say('🏆 HIGHSCORE 🏆');
$this->say($topUsers->implode("\n"));
}
}
We use the topUsers data to build a little highscore table, as well as adding some other text replies. Also, emojis always help! 😉
To trigger this conversation, we need another listener. Besides the highscore keyword I also add /highscore which will become a Telegram command later.
$botman->hears('/highscore|highscore', function (BotMan $bot) {
    $bot->startConversation(new HighscoreConversation());
})->stopsConversation();
Type one of the keywords to the bot to see what happens. It will tell you that the highscore is still empty.
For testing purposes, we can manually add a few highscore entries to the table. I will use Sequel Pro to do that. Now we should get some highscore entries back. Notice the users with the same points will share a rank.
Ask User About Highscore
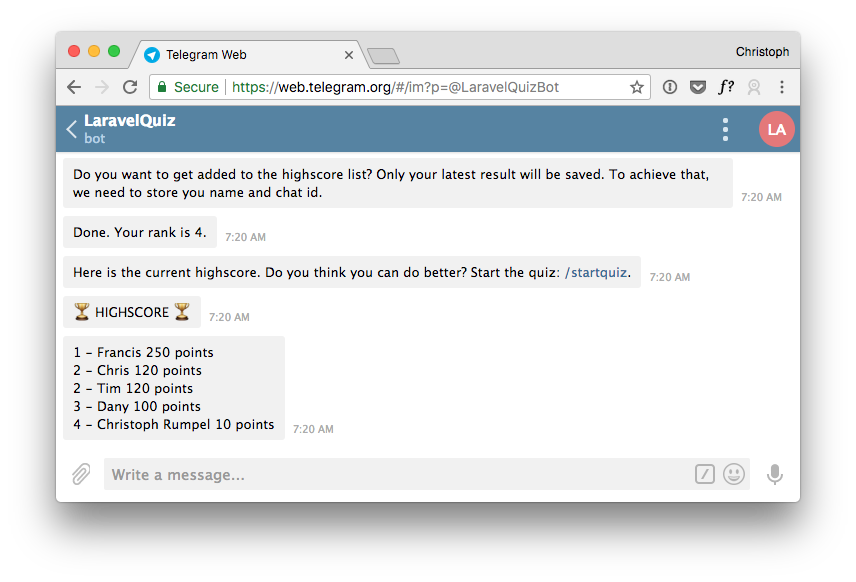
After a quiz, I want to ask the user, if he wants to get added to the highscore. This is a good idea because we need to store personal data like his chat id and name to do so. I don't want to save him without consent.
After showing the user his result, we ask him about the highscore. If he agrees, we will store him to the highscore table. We use the saveUser method we created earlier within the Highscore model. Additionally, we start the highscore conversation to show the other results. If the user does not want to get stored, we just reply with text messages.
private function showResult()
{
    $this->say('Finished 🏁');
    $this->say("You made it through all the questions. You reached {$this->userPoints} points! Correct answers: {$this->userCorrectAnswers} / {$this->questionCount}");

    $this->askAboutHighscore(); // this is new in this method
}

private function askAboutHighscore()
{
	$question = BotManQuestion::create('Do you want to get added to the highscore list? Only your latest result will be saved. To achieve that, we need to store your name and chat id.')
		->addButtons([
			Button::create('Yes please')->value('yes'),
			Button::create('No')->value('no'),
		]);

	$this->ask($question, function (BotManAnswer $answer) {
		switch ($answer->getValue()) {
			case 'yes':
				$user = Highscore::saveUser($this->bot->getUser(), $this->userPoints, $this->userCorrectAnswers);
				$this->say("Done. Your rank is {$user->rank}.");
				return $this->bot->startConversation(new HighscoreConversation());
			case 'no':
				return $this->say('Not problem. You were not added to the highscore. Still you can tell your friends about it 😉');
			default:
				return $this->repeat('Sorry, I did not get that. Please use the buttons.');
		}
	});
}
When you give the quiz another try, you will see the question about the highscore at the end.
Nice! We have already come a long way, and the bot looks excellent. We can play the quiz and the highscore works as well.
Extras
Welcome
To give the user a better experience, we are going to create an app/Conversations/WelcomeConversation.php class. It will take care of onboarding the user. First, we welcome him and tell some info about the purpose of this bot. Then we ask if he is ready for the quiz. If he is, we start the quiz conversation.
<?php
namespace App\Conversations;
use BotMan\BotMan\Messages\Incoming\Answer;
use BotMan\BotMan\Messages\Outgoing\Question;
use BotMan\BotMan\Messages\Outgoing\Actions\Button;
use BotMan\BotMan\Messages\Conversations\Conversation;
class WelcomeConversation extends Conversation
{
/**
* Start the conversation.
*
* @return mixed
*/
public function run()
{
$this->welcomeUser();
}
private function welcomeUser()
{
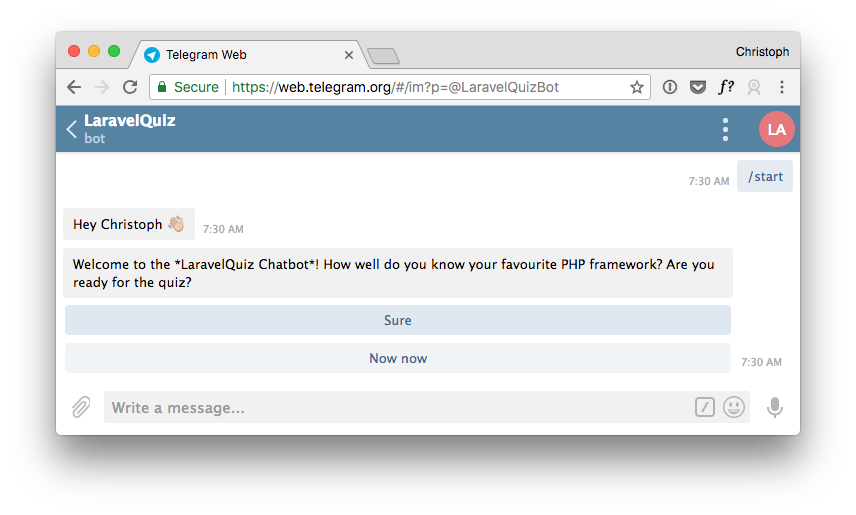
$this->say('Hey '.$this->bot->getUser()->getFirstName().' 👋');
$this->askIfReady();
}
private function askIfReady()
{
$question = Question::create('Welcome to the *LaravelQuiz Chatbot*! How well do you know your favourite PHP framework? Are you ready for the quiz?')
->addButtons([
Button::create('Sure')->value('yes'),
Button::create('Not now')->value('no'),
]);
$this->ask($question, function (Answer $answer) {
if ($answer->getValue() === 'yes') {
$this->say('Perfect!');
return $this->bot->startConversation(new QuizConversation());
}
$this->say('😒');
$this->say('If you change your opinion, you can start the quiz at any time using the start command or by typing "start".');
});
}
}
To trigger this new conversation, we add another listener. The keyword /start is also what gets called when a Telegram user joins the bot for the first time.
$botman->hears('/start', function (BotMan $bot) {
    $bot->startConversation(new WelcomeConversation());
})->stopsConversation();
This time the listener gets extended through the stopsConversation method. It means that when this command is used within a conversation, it will get stopped to start a new quiz. I use this for all Telegram commands so that the user can use them at any time.
Delete User Data
Since the GDPR it is essential to give the user the possibility to delete his stored data. I want to handle that in a new app/Conversations/PrivacyConversation.php class. First we make sure we have stored this current user. If so, we ask him if he really wants to delete his highscore entry.
<?php

namespace App\Conversations;

use App\Highscore;
use BotMan\BotMan\Messages\Incoming\Answer;
use BotMan\BotMan\Messages\Outgoing\Question;
use BotMan\BotMan\Messages\Outgoing\Actions\Button;
use BotMan\BotMan\Messages\Conversations\Conversation;

class PrivacyConversation extends Conversation
{
    /**
     * Start the conversation.
     *
     * @return mixed
     */
    public function run()
    {
        $this->askAboutDataDeletion();
    }

    private function askAboutDataDeletion()
    {
	$user = Highscore::where('chat_id', $this->bot->getUser()->getId())->first();

	if (! $user) {
		return $this->say('We have not stored any data of you.');
	}

	$this->say('We have stored your name and chat ID for showing you in the highscore.');
	$question = Question::create('Do you want to get deleted?')->addButtons([
		Button::create('Yes please')->value('yes'),
		Button::create('Not now')->value('no'),
	]);

	$this->ask($question, function (Answer $answer) {
		switch ($answer->getValue()) {
			case 'yes':
				Highscore::deleteUser($this->bot->getUser()->getId());
				return $this->say('Done! Your data has been deleted.');
			case 'no':
				return $this->say('Great to keep you 👍');
			default:
				return $this->repeat('Sorry, I did not get that. Please use the buttons.');
		}
	});
    }
}
The deleteUser is a new Highscore model method you have to add.
public static function deleteUser(string $chatId)
{
	Highscore::where('chat_id', $chatId)->delete();
}
About
If someone wants to know more about this bot, I will give him the possibility by adding some about info. Since I only return one little text message, I will handle it inside the listener.
$botman->hears('/about|about', function (BotMan $bot) {
    $bot->reply('LaravelQuiz is a project by Christoph Rumpel. Find out more about it on https://christoph-rumpel.com');
})->stopsConversation();
Telegram Commands
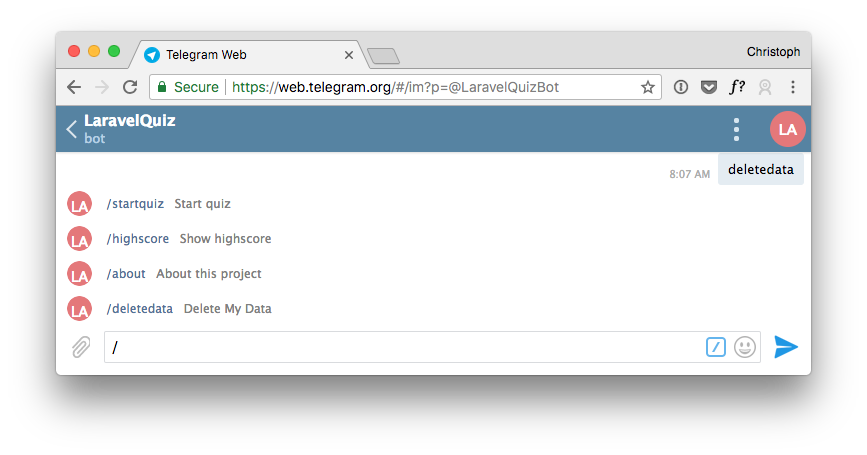
This is an excellent time to add the Telegram commands to the bot. You need to use Telegram's BotFather to achieve that. Follow his instructions to edit the bot and add the commands. You always have to fill all the commands at once.
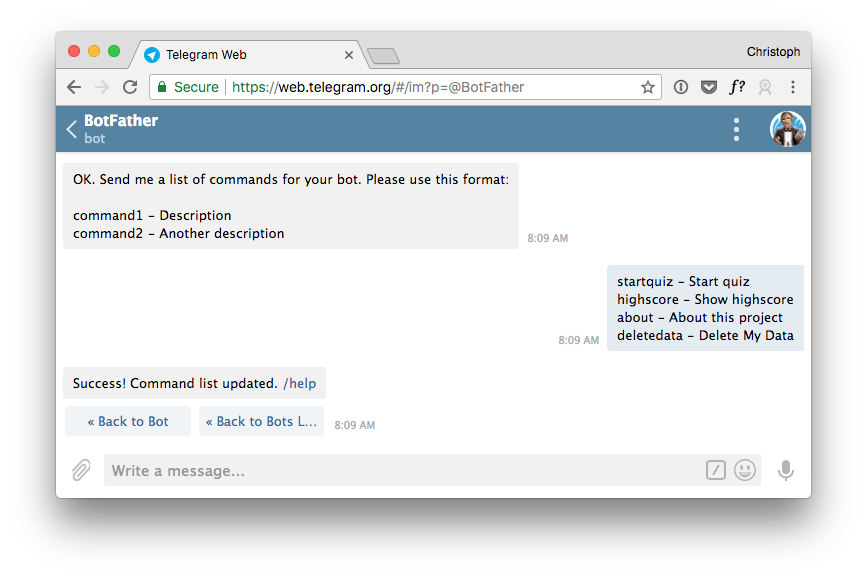
When you start typing / you will see all the commands. Now it is effortless for the user to trigger the main features.
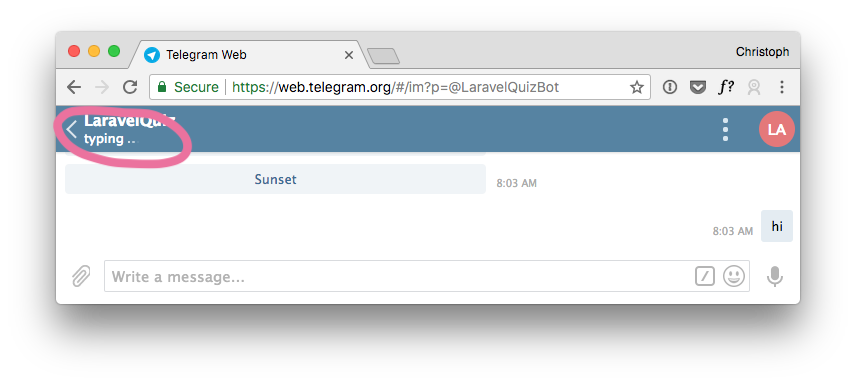
Typing Indicator
With chatbots, it is common to show that they are typing while processing the message. This feels more natural because we are used to these indicators when we talk to friends. In BotMan it is straightforward to use it inside conversations, but I want to add it to a middleware. This way I can activate them for all outgoing messages.
php artisan botman:make:middleware TypingMiddleware
This command will generate the class for use. Delete the dummy code and replace it with the following. We only need the sending method, which will be active when BotMan sends a message back to the messenger.
<?php

namespace App\Http\Middleware;

use BotMan\BotMan\BotMan;
use BotMan\BotMan\Interfaces\Middleware\Sending;

class TypingMiddleware implements Sending
{

    public function sending($payload, $next, BotMan $bot)
    {
        $bot->typesAndWaits(1);

        return $next($payload);
    }
}
Also, the middleware must be added to the main BotMan instance in the BotMan route file.
$typingMiddleware = new TypingMiddleware();
$botman->middleware->sending($typingMiddleware);
Testing
For this article, I left out handling tests. Of course, this doesn't mean they are not important. But the focus was on different parts of this app. If you like to know more about how to test conversations, check my article Build a newsletter chatbot in PHP - Part 3.
Conclusion
And again, this article got much longer than expected. But I hope all the details can help you to build similar chatbots yourself. For me, especially the part about looping over stored questions was fascinating. This gives you a lot of new possibilities to build conversations dynamically.
I always love to put out real projects because they help people more than fictive ones. Another real chatbot project is included in my book Build Chatbots with PHP. Subscribe to the email list to get a free sample chapter and to receive more info about this new project of mine.